
This is a preview feature and it is not available yet.
This guide explains how to access Teleporte data from a ClickHouse Database. ClickHouse is a database designed for analyzing large volumes of data. Unlike a transactional database, such as the one Teleporte uses for real-time operations, ClickHouse enables reporting tools like Power BI and Oracle Analytics to query and cross-reference large amounts of information very quickly, without affecting the performance of production systems.
ClickHouse a robust technology widely used in the industry for analytical use cases and allows us to keep Teleporte’s reporting environment completely separate from its production environment.
1. Installation of the ODBC Driver
Before connecting Power BI to ClickHouse, install the ClickHouse ODBC Driver on your Windows computer.
Before you begin
Make sure you have:
- A Windows computer with administrator permissions.
- Power BI Desktop is installed.
- A 64-bit version of Power BI Desktop, in most cases.
The ODBC driver and Power BI Desktop must use the same architecture. For most current installations, use the 64-bit driver.
Download the ClickHouse ODBC Driver
- Open the official ClickHouse ODBC Driver releases page.
- Open the latest stable release.
- Download the Windows 64-bit
.msiinstaller from Assets.
Install the driver
- Open the downloaded
.msifile. - If Windows displays a security warning, select Run or Allow.
- Follow the installation wizard and accept the license agreement.
- Keep the default installation options unless your organization requires a different location.
- Select Install.
- Select Finish when the installation is complete.
Verify the installation
- Open the Windows Start menu.
- Search for ODBC Data Sources.
- Open ODBC Data Sources (64-bit).
- Select the Drivers tab.
- Confirm that a ClickHouse ODBC driver appears in the list.
Windows provides separate ODBC administrators for 32-bit and 64-bit applications:
- 64-bit ODBC Administrator:
C:\Windows\System32\odbcad32.exe - 32-bit ODBC Administrator:
C:\Windows\SysWOW64\odbcad32.exe
Use the administrator that matches your Power BI Desktop installation.
Restart your computer
After installing the ODBC driver:
- Close Power BI Desktop completely.
- Restart the Windows computer.
- Open Power BI Desktop again after Windows has restarted.
2. What You Need Before Connecting Power BI Desktop to ClickHouse
Connection information from Sera4
You need the following information from Sera4:
- Host
- Port
- Database
- ClickHouse username
- ClickHouse password
If you do not have this information, contact Sera4 Customer Support at CS@sera4.com.
Provide your public IP address to Sera4
Sera4 needs to allow your public IP address before your computer can connect to the Teleporte ClickHouse database.
To find your public IP address:
- Open Windows PowerShell.
- Run the following command:
(Invoke-RestMethod -Uri "https://api.ipify.org").Trim() - Copy the result and send it to Sera4 Customer Support at CS@sera4.com.
Your public IP address may change if your internet provider assigns dynamic IP addresses. If your connection stops working after an IP address change, send the new address to Sera4.
3. Steps to Connect Power BI Desktop to ClickHouse
- Open Power BI Desktop.
- Select Home > Get data.
- Select the ClickHouse connector.
- Select Connect.
- Enter the connection information provided by Sera4:
- Host: Enter the ClickHouse host. (Make sure you DON'T add "https://" at the beginning)
- Port: Enter the ClickHouse port.
- Database: Enter the database name.
- Options: Leave blank unless Sera4 provides specific options.
- Data connectivity mode: Select Import or DirectQuery, according to your reporting requirements. We recommend using DirectQuery due to the large amount of data.
- Select OK.
- When prompted for authentication, select the ClickHouse username and password authentication method.
- Enter the ClickHouse username and password provided by Sera4.
- Select Connect.
- In the Navigator window, select the Teleporte tables you want to use.
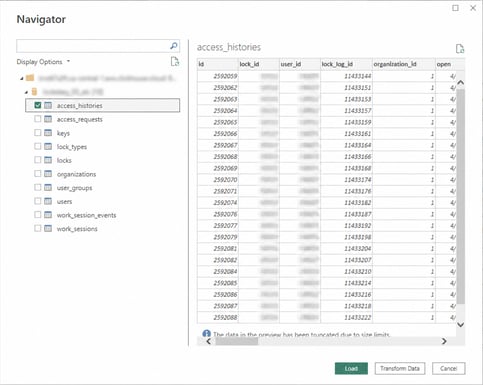
- Select Load to import the data directly into Power BI, or select Transform Data to make changes before loading it.
4. You Are Ready to Use Your Teleporte Data
Your Teleporte data is now connected to Power BI Desktop and is ready to use. You can create reports, dashboards, charts, and other visualizations using the available Teleporte tables and fields.
The following image shows an example of Teleporte data being visualized in Power BI:
.png?width=670&height=381&name=image%20(54).png)
If the connection fails
Check the following:
- The host, port, and database were entered exactly as provided by Sera4.
- The username and password are correct.
- Your public IP address has been provided to Sera4. Make sure you have a confirmation via email.
- The ClickHouse ODBC driver was installed successfully.
- Power BI Desktop was closed, and Windows was restarted after installation.
- Your computer has network access to the ClickHouse service.
For additional help, contact Sera4 Customer Support at CS@sera4.com.